
ATTENTION!
Thanks for landing on this tutorial, its been so popular that I have moved it to my new Web Site https://sidyoung.com/ all motorcycle related content will be removed from WordPress.org and moved to my new site over 2019-2020 period.
Before you start
The repair process requires dropping the motor from the frame, turning it upside down and removing the bottom half of the engine (bottom engine case). If you cant do that then guess what – you wont be able to replace/repair the starter clutch.
Difficulty scale – EASY but very time consuming, expect to spend 10hrs getting the job completed.
What you need
- Gasket set for side covers -see Craig at the GPzZone UK Shop
- Liquid Gasket (3M Threebond – http://www.threebond.com.au/liquid-gaskets.html) also sold by each manufacturer i.e. “Kawasaki Bond”
- Starter clutch kit (springs at the minimum)
- Tools
- Clean work area
- Oil filter
- Fresh Oil
Setup
Drain the engine of oil and then remove the engine as per the service manual.

Carefully tip the engine upside down and secure it. You will need access to both sides and the entire bottom end. First remove the sump.

Then remove all covers that cross both case halves, we will split the bottom case off so nothing can be left on that attaches to the bottom case.

Keep careful track of the bolts and their locations, some reside in oil and some dont. Check the service manual to make sure which ones need liquid gasket sealant applied during rebuild.
- Remove all the 8mm bolts that hold the cases together, there are 3 in the sump and 6 that hold the crankshaft directly.
- Remove the 6mm bolts that hold the cases at the front and the 3 long ones at back of the engine.
- Remove the side cases – clutch cover, ignition cover and chain drive cover.
- Remove the sprocket and remove the transmission cover under it.

Keep track of any cable clamps. They need to go back into the same spot.

With the sump off, remove the filter and the oil pump assembly. There are three silver bolts one is buried under the oil that remains where the filter sits. Remove the oil pipes and gauze.

Keep track of all the parts! These are laid out as removed and cleaned before putting down. Try and keep everything spotless.

Keep track of this little piece as well, the first time I took a GPz900R engine apart this poped out and it took ages to work out where it went (rear of the engine).

This cover comes off and we can see the clutch basket (top right), crankshaft end (left with small HyVo chain) and the secondary shaft that the starter clutch sits on (bottom with chain behind it).

Take the ignition cover off and remove the disk, unbolt the sensors as they sit aside both cases.

Take the transmission cover off and remove anything that traverses the case halves.
Separation

Carefully lift the bottom case off, most of the bits are in the “top” case, which is facing down at the moment. The counter balancer is in the bottom case and drives off the crank, its alignment will change when you lift off the case. It will need to be reset when we re-assemble the cases. If you dont reset it back to the correct orientation to the crank you will end up with lots of additional vibration.
Notice the ignition timing sensors are removed from their mounting point also during the disassembly.

Looking at the top case, we can now see the starter clutch just above the clutch input shaft, to get to it we need to lift out the clutch basket.
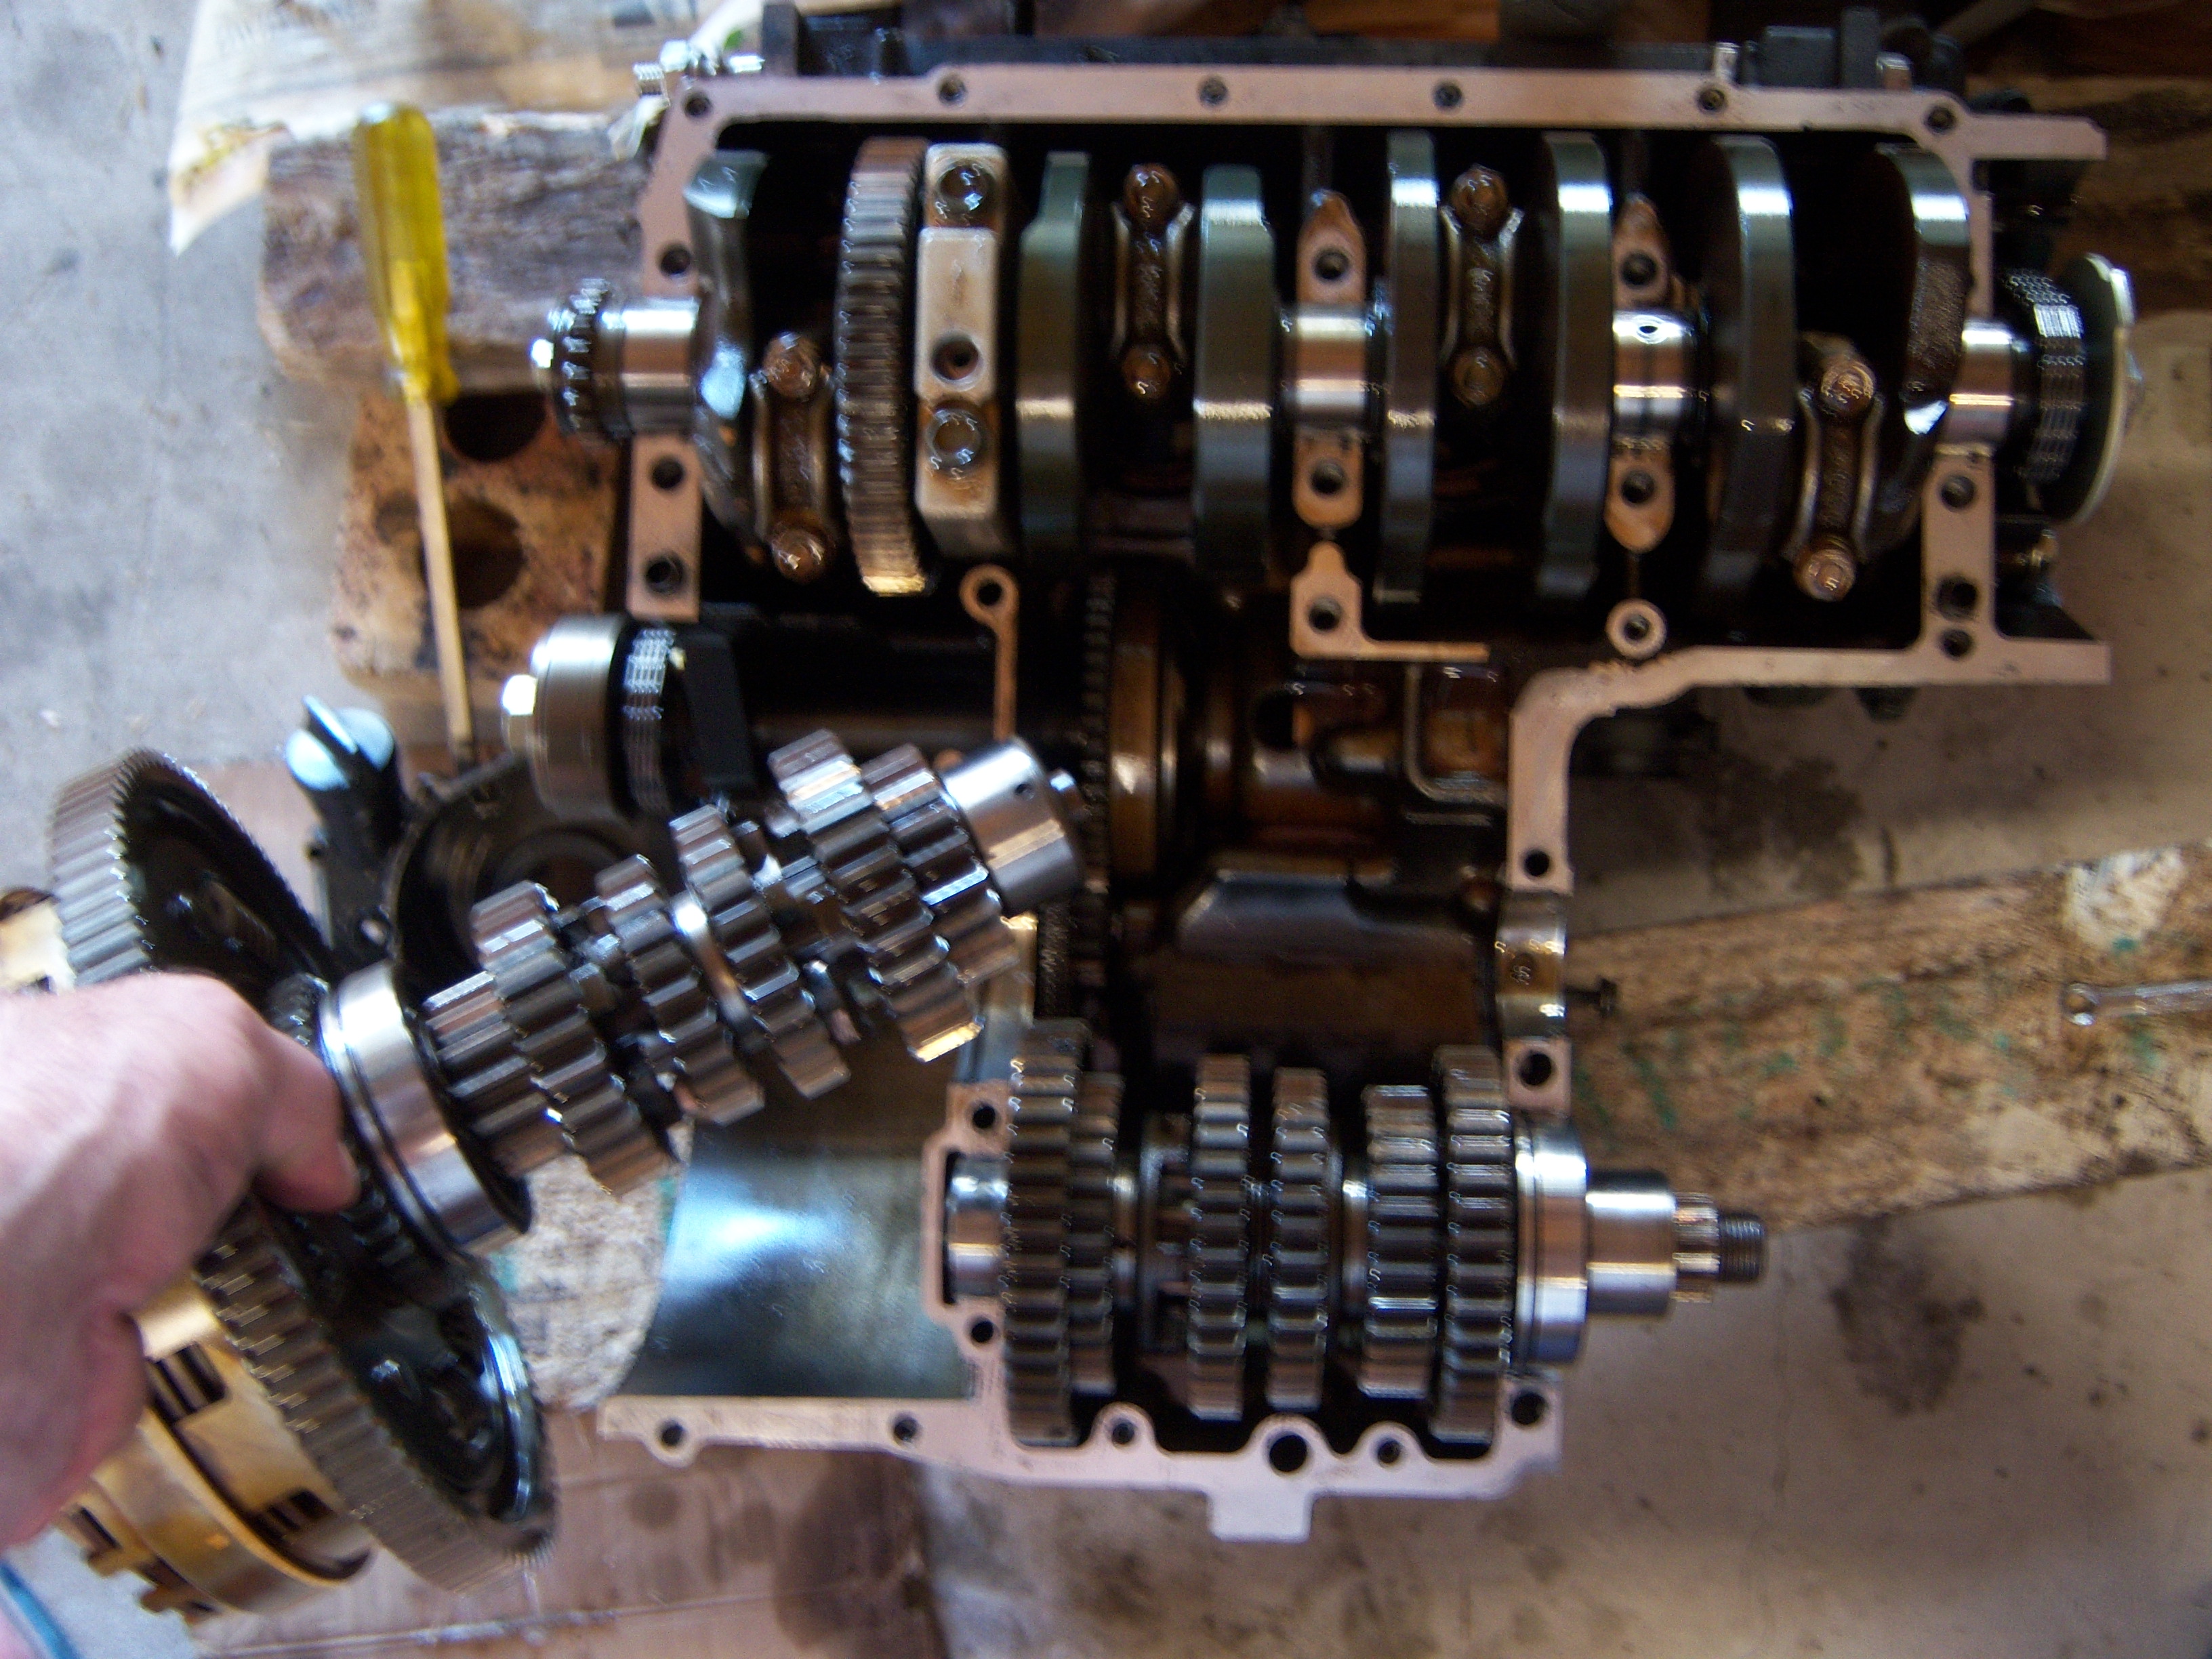
This shot is slightly out of sequence, I removed the secondary sprocket and pulled it to the left, then I picked up the clutch assembly. First you need to remove the clutch assembly then unbolt the secondary shaft as show below.

Under the input shaft is a bolt that holds a pin in. The pin is the support for a idler wheel that drives the input shaft when the starter motor is turning the starter clutch. Remove the bolt.

Then remove the pin and lift out the idler wheel.

Take out this bolt from the end of the secondary shaft on the right hand side. You should be able to pull the shaft to the left. There should be a cover over it.

The secondary shaft is driven from the end of the crankshaft. The toothed gear on the end of the crankshaft can be unbolted. Unbolt it now and then slide the secondary shaft to the left. Below the secondary shaft is the idler wheel we removed previously. Hold the starter clutch as you remove the shaft as the starter clutch is sitting on the shaft.

Success!!!! The starter clutch is now free to lift out and remove. Note that the secondary shaft is not fully removed and on the right is the cover over the right hand side.
The Starter Clutch
The reason the starter clutch fails to turn the motor is obvious when you understand how it works. The picture below shows the springs have failed and the rollers are not being pushed out.


Of all the failures in a GPz900R engine (there aren’t many) the prime failure component is the starter clutch. This one is a perfect example of what can happen. The roller is meant to be spring loaded but in these two photo’s I pushed the roller and it remained out. The other two rollers are OK, so the clutch kind of worked but could not fully engage. Toss the springs and fit your new ones.
Installation
Install the starter clutch and push the secondary shaft back in, bolt it down and pass the chain back over the crankshaft. If you cannot source GPz900R springs, you can use a set from the z650 and I suspect the z900 units (they never fail).
Push the idler wheel back in and secure it with the 8mm bolt you removed earlier. Now put the 8mm bolt back in on the other end of the secondary shaft.
Now reverse the remainder of the disassembly process but clean all the surfaces first and have new gaskets ready. Use the liquid gasket on the case halves so it is sealed and if done right wont leak.
When you re-align the counter balance shaft, set TDC on cylinder 1 & 4, find the small drilled mark on the balancer weight, aligned with the small oil hole on the crankshaft gear.
ZZR1100 starter clutch
I have heard that the zzr1100 starter clutch is a better option, however it is not a straight swap. Jan Ovv, a GPz900R enthusiast from Norway emailed me the process he used to replace the starter clutch. The starter clutch gear is 3mm larger so the idler wheel has to be replaced as well. If you go down this path, try it and let me know what issues you encounter.

This is perfect….
great instructions to walk me through the process on my ’85 A2. Engines already dropped and side covers off, looks lime i’m 1/2way there. Thank you for posting this going to make my night a lot easier!
Blessings on you for providing this. Spare motor purchased for 300.00 cdn. becuase the starter clutch has failed, mucho appreciato…This is my winter project.
Just installed a replacement starter clutch a ZZR 1100 one. Went straight in no messing around changing any other components. You do however need to replace the engine bolts,don’t re use the old ones as they don’t stand up to being tightened twice.
This is a great article on a job that would seem difficult for most garage mechanics. Reading this article beforehand gave me the confidence to tackle this project with little to no fear of taking it on.
I upgraded to the ZX1100 starter clutch and Idler-gear and as Brian said above, it’s a direct drop in replacement. Being that the replacement starter clutch was an ebay purchase, I opted to refurbish and replace all of the internal parts to this clutch. It gave me peace of mind knowing that I should hopefully never have to go back into this part of the engine ever again. AT LEAST IN THEORY 🙂
Having the Kawasaki shop manual would also be a strong recommendation for the step by step sequence, and needed torque values.
Due to the weak design of the Original 3 bearing starter clutch, I would not re-install the old design. Over the years, I have rarely heard of the starter clutch going out on the 1100 series engines, which has many more bearings to more evenly distribute the load required to start the engine. Its a far superior design.
Regards.
T.
of what year did you replaced it??
Hi,
I recently was gifted (yes, really) a GPZ900R ’94 with 30.000 on the clock. I was told it has been put away running and that it ran right before I got it, however it did so poorly.
When I got it however, I didn’t fire at all. I cleaned the carbs, replaced spark plugs wires and caps and I replaced the battery. However when I start it, it doesn’t want to turn over at all. It just makes a weird electrical noise and the rev meter goes up to 6 or 8 thousandish.
Do you have any idea what the problem could be?
Kind regards,
Wesley.
I would check all the wiring and connectors and make sure the side stand switch is working as it will not start if it thinks its in gear and the side stand is down.
When you hit the starter it should make a click as the starter relay pulls in. Also, you can just put it in neutral and jumper the starter relay with a screw driver and see if the starter motor turns over AND turns the engine over.
I also suggest joining the GPz Zone UK forum.
Thanks for your answer! I will check this weekend.
Also; I have just purchased your book 🙂 Look forward to reading it!
Hi,I have a gpz1000rx and i am currently recutting the valve seats and replacing valve stems as well as rebore and new Pistons ,I was wanting to check the starter clutch as I have suspicions that it might be on its way out,do I still have to remove gear box or can I exit it from the top end as head and cylinder are already removed
On the GPz900R and even the z650, access is from the bottom case being removed, top end does not have to come apart. I have not stripped a GPz1000RX but its basically a bored out GPz900R so its going to be very similar.
Gear box out then,cheers
Great break down but I am having trouble pin pointing the issue with my starter clutch gear. My Gear turns properly and locks up when rotated. however when I have the starter clutch gear assembled on the shaft, if rotates both ways implicating a failure. Springs were in good order but the needle bearings underneath seemed worn. Could this be the issue?
If its not locking up in one direction then there may not be enough spring pressure to force the rollers onto the shaft?
This article is very simple and informative.I know this segment is to leave a reply,but I’m in need of advise before I split open the engine.My bike 84 ninja 900r with 6k.This spring she did not want to start so I keep pushing the starter until a clank noise.Now if the starter is press for more than 5 sec the bang starts.And at idle intermitently sound like a chain slapping and die.
and getting noisier.Any advise will be appreciated.
Hi Jose,
Without seeing it I am hesitant to offer a reply. Once the engine starts the starter is effectively disabled, sounds like something else is broken. Let me know what you find.
Sid
Hi,I would check the cam chain and tensioner,if there ok I would then do a compression check it could possibly be a broken con rod or piston
Awesome step/by/step instructions. Thanks for taking the time to show us how it’s done.
Nice tutorial but i have after change to 1000 RX starter clutch a problem. I also changed the wheel. Starting is good, no noises from engine. Running is good also. When driving with engine i get a scrap scrap scrap from the engine. Also when i turned the engine of and rolling. I reckon for contact from the wheel to the body of the engine. Will now look in my oil first. lWhat can this be? Thanks
If you get the noise with the engine off and clutch disengaged then I would remove the chain if possible and check, that would point clearly to the frame mounted components and disks/wheels/bearings/calipers etc. If it makes no noise then put the chain back on and recheck the front sprocket and chain path… just do some basic investigation, it should be pretty easy to isolate it.
Many thanks for this. I have got to do the starter clutch on my GPZ 900 A2 and this is just what I needed as both the factory manual and the Haynes were confusing and in me bit contradictory. Thanks again.
I upgraded my 900r starter clutch with a ZRX1200 one.I crossed matched part numbers and its the same component on the ZZR11 and ZRX 11 and 12.
It was a total straight swap with no ZRX idler gear needed.I used my original 900r one as it was the same cross matched part number.
Dead easy job to do.
I have built many ZRX/900r/ZZR motors and made some mongrel ones up too….with a ZRX having a six speed box.
I would not advise a repair on a stock 900r starter clutch and opt for the latter ZRX/ZZR unit that is a far far superior component that I have NEVER seen fail.
My ZRX starter clutch came of ebay for £20!!.The gaskets were the biggest expense.
Great info page btw.
Dean UK
Hi Dean, just a point on fitting these clutches that no one seems to have metioned is the oil feed hole from the starter shaft and the clutch assembly. After rebuilding my 900r many times due to number 3 big end failure on numerous occasions. It was on a rebuild when l removed my clutch amd shafts to clean before assembly. I did not notice oil feed hole and after only a few hundred kms the starter clutch started failing. Upon investigating why a clutch could suddenly fail l found that these holes must be aligned to supply the clutch with good oil flow. Any thoughts or knowledge of this never metioned info..?
Hi Joe,
Many people pay little attention to ANY oil gallery or passage when dismantling this particular generation of engine. I have come across it many times and can only advise that on standard clutch units, it is important. BUT when a clutch has failed more than twice I have found ovality on the drive gear upon which the clutch rollers lock. You can replace the rollers as much as you like and they will still fail after minimal mileage.
I have even had customers fit totally new kits and springs and they still wont operate for this reason. Then they come to me.
I partially blame poor oil supply but also recognise it as a genuine design flaw and weakness.
I always opt for the latter sprag clutch unit off the later models as above for this reason. Once done, they never go. I have recently done the same conversion for a Z650 B1 using a ZR7 clutch unit on a Z650b1 shaft.
Kawasaki was aware of the starter clutch issues on both on early small Zeds and the GPz900r/ and hence addressed both with upgraded sprag units until the end of production in 2005.
All engines on assembly should be meticulously cleaned and inspected on assembly/inspection.
I have put right so many ‘back yard’ engine builds due to this lack of detail.
The worst I have seen and done was a total build on a CBX1000 engine ‘done in a shed’. Being clinical is the key.
Sorry about the delay in reply.
Best Regards from UK/ Dean
Hi Dean,
Very informative. You obviously rebuild these a lot. I have a GPZ900A2 in need of a starter clutch replacement. It also has low compression on cylinder No.4. Its been standing for about 10 years from what I can gather before I bought it. I got it running and have overhauled the frame, drivetrain, brakes and suspension. This just leaves the engine and I am thinking to get someone to do it for me. Is this something I could come to you for?
Regards
Ian
Buckingham UK.
Help… the little black plastic pipe fell into oil sump (just like it did to you) and i dont know how to reassemble. Can you descripe how to put it back? regards Kristian from Denmark
Its a push fit in a hole at the rear of the sump…
Hi, since you repaired, Did it have any kind of failure in the same area?
I’m trying to dicide whether to repair it with the parts of a 1987 GPZ900 or replace it with a 1992 ZZR1100, as I’ve research, both are valid for the 1985 GPZ900, wich I have.